The Absolute Beginner’s Guide to Google Analytics
If you don’t know what Google Analytics is, haven’t installed it on your website, or have installed it but never look at your data, then this post is for you. While it’s hard for many to believe, there are still websites that are not using Google Analytics (or any analytics, for that matter) to measure their traffic. In this post, we’re going to look at Google Analytics from the absolute beginner’s point of view. Why you need it, how to get it, how to use it, and workarounds to common problems.
Why you need Google Analytics
Do you have a blog? Do you have a static website? If the answer is yes, whether they are for personal or business use, then you need Google Analytics. Here are just a few of the many questions about your website that you can answer using Google Analytics.
- How many people visit my website?
- Where do my visitors live?
- Do I need a mobile-friendly website?
- What websites send traffic to my website?
- What marketing tactics drive the most traffic to my website?
- Which pages on my website are the most popular?
- How many visitors have I converted into leads or customers?
- Where did my converting visitors come from and go on my website?
- How can I improve my website’s speed?
- What blog content do my visitors like the most?
There are many, many additional questions that Google Analytics can answer, but these are the ones that are most important for most website owners. Now let’s look at how you can get Google Analytics on your website.
How to install Google Analytics
First, you need a Google Analytics account. If you have a primary Google account that you use for other services like Gmail, Google Drive, Google Calendar, Google+, or YouTube, then you should set up your Google Analytics using that Google account. Or you will need to create a new one.
This should be a Google account you plan to keep forever and that only you have access to. You can always grant access to your Google Analytics to other people down the road, but you don’t want someone else to have full control over it.
Big tip: don’t let your anyone (your web designer, web developer, web host, SEO person, etc.) create your website’s Google Analytics account under their own Google account so they can “manage” it for you. If you and this person part ways, they will take your Google Analytics data with them, and you will have to start all over.
1. Set up your account and property
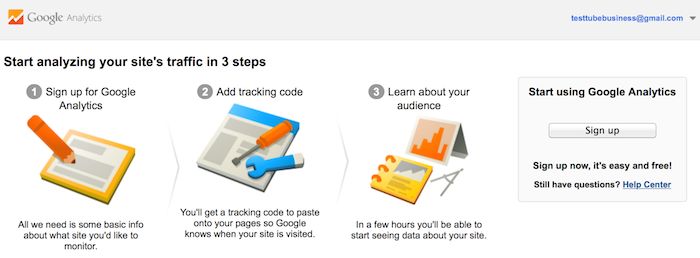
Once you have a Google account, you can go to Google Analytics and click the Sign into Google Analytics button. You will then be greeted with the three steps you must take to set up Google Analytics.
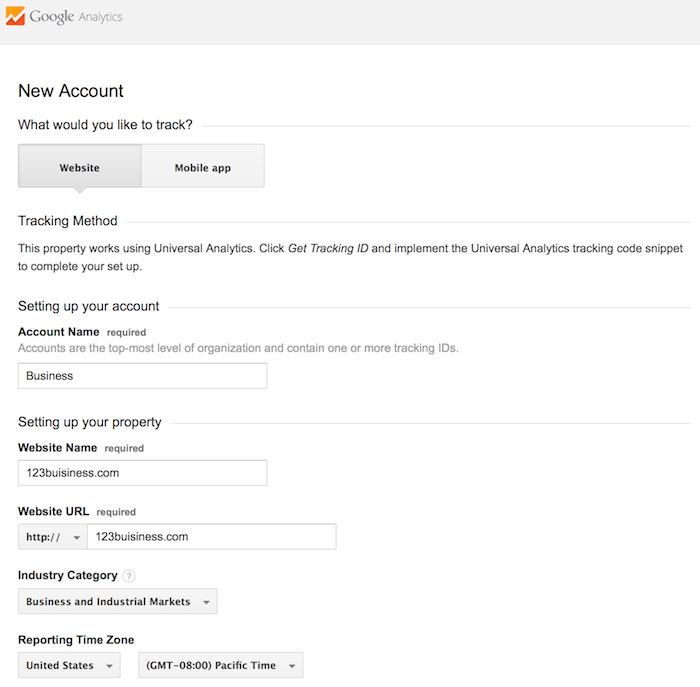
 After you click the Sign Up button, you will fill out information for your website.
Google Analytics offers hierarchies to organize your account. You can have up to 100 Google Analytics accounts under one Google account. You can have up to 50 website properties under one Google Analytics account. You can have up to 25 views under one website property.
Here are a few scenarios.
- SCENARIO 1: If you have one website, you only need one Google Analytics account with one website property.
- SCENARIO 2: If you have two websites, such as one for your business and one for your personal use, you might want to create two accounts, naming one “123Business” and one “Personal”. Then you will set up your business website under the 123Business account and your personal website under your Personal account.
- SCENARIO 3: If you have several businesses, but less than 50, and each of them has one website, you might want to put them all under a Business account. Then have a Personal account for your personal websites.
- SCENARIO 4: If you have several businesses and each of them has dozens of websites, for a total of more than 50 websites, you might want to put each business under its own account, such as 123Business account, 124Business account, and so on.
There are no right or wrong ways to set up your Google Analytics account—it’s just a matter of how you want to organize your sites. You can always rename your accounts or properties down the road. Note that you can’t move a property (website) from one Google Analytics account to another—you would have to set up a new property under the new account and lose the historical data you collected from the original property.
For the absolute beginner’s guide, we’re going to assume you have one website and only need one view (the default, all data view. The setup would look something like this.
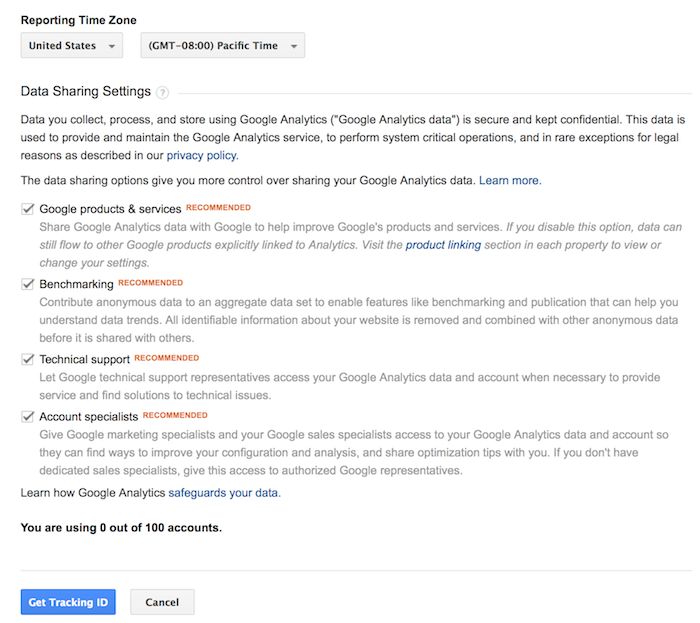
 Beneath this, you will have the option to configure where your Google Analytics data can be shared.
 2. Install your tracking code
Once you are finished, you will click the Get Tracking ID button. You will get a popup of the Google Analytics terms and conditions, which you have to agree to. Then you will get your Google Analytics code.
![]() This must be installed on every page on your website. The installation will depend on what type of website you have. You should be able to find easy instructions to install Google Analytics on any website by doing a web search for your platform + how to install Google Analytics.
This must be installed on every page on your website. The installation will depend on what type of website you have. You should be able to find easy instructions to install Google Analytics on any website by doing a web search for your platform + how to install Google Analytics.
Set up goals
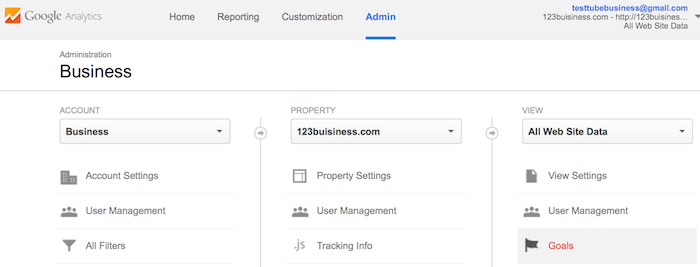
After you install your tracking code on your website, you will want to configure a small (but very useful) setting in your website’s profile on Google Analytics. This is your Goals setting. You can find it by clicking on the Admin link at the top of your Google Analytics and then clicking on Goals under your website’s View column.
 Goals will tell Google Analytics when something important has happened on your website. For example, if you have a website where you generate leads through a contact form, you will want to find (or create) a thank you page that visitors end upon once they have submitted their contact information. Or, if you have a website where you sell products, you will want to find (or create) a final thank you or confirmation page for visitors to land upon once they have completed a purchase.
That URL will likely look something like this.
- http://123business.com/thank-you
- http://123business.com/thank-you/
- http://123business.com/thank-you.html
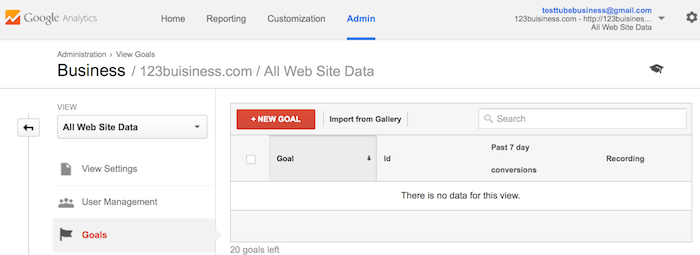
In Google Analytics, you will click on the New Goal button.
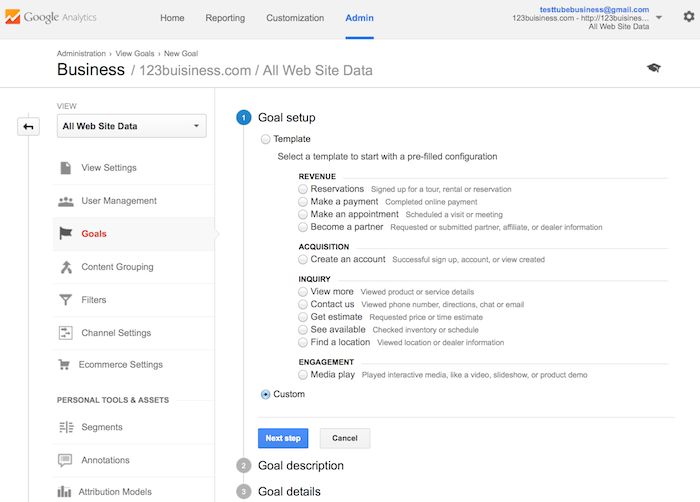
 You will choose the Custom option (unless one of the other options are more applicable to your website) and click the Next Step button.
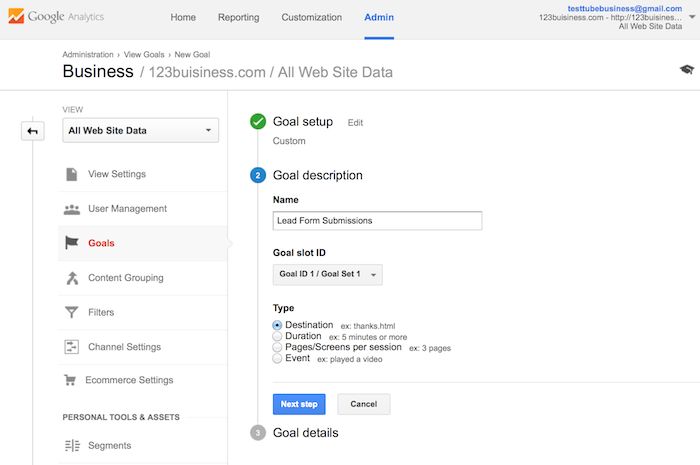
 You will name your goal something you will remember, select Destination, and then click the Next Step button.
 You will enter your thank you or confirmation page’s URL after the .com of your website in the Destination field and change the drop-down to “Begins with”.
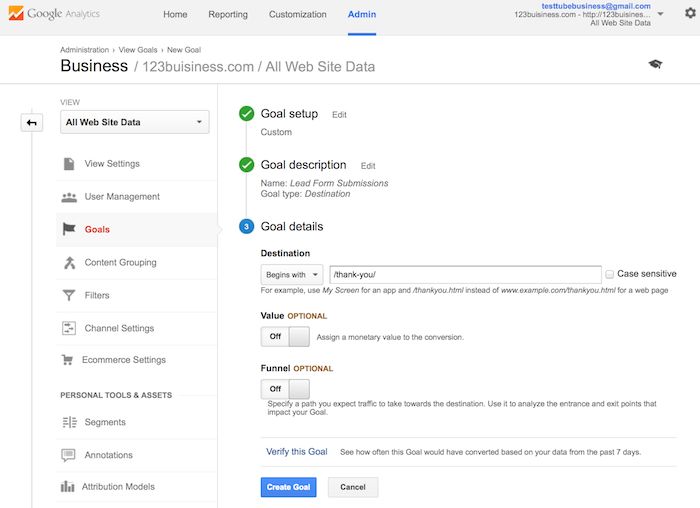 You will then toggle the value and enter a specific dollar value for that conversion (if applicable) and click Create Goal to complete the setup.
If you have other similar goals / conversions you would like to track on your website, you can follow these steps again. You can create up to 20 goals on your website. Be sure that the ones you create are highly important to your business. These goals (for most businesses) include lead form submissions, email list sign ups, and purchase completions. Depending on your website and its purpose, your goals may vary.
Note that this is the simplest of all conversion tracking in Google Analytics. You can review the documentation in Google Analytics support to learn more about setting up goal tracking.
3. Set up site search
Another thing you can set up really quickly that will give you valuable data down the road is Site Search. This is for any website with a search box on it.
First, run a search on your website like below. Then keep the tab open. You will need the URL momentarily.
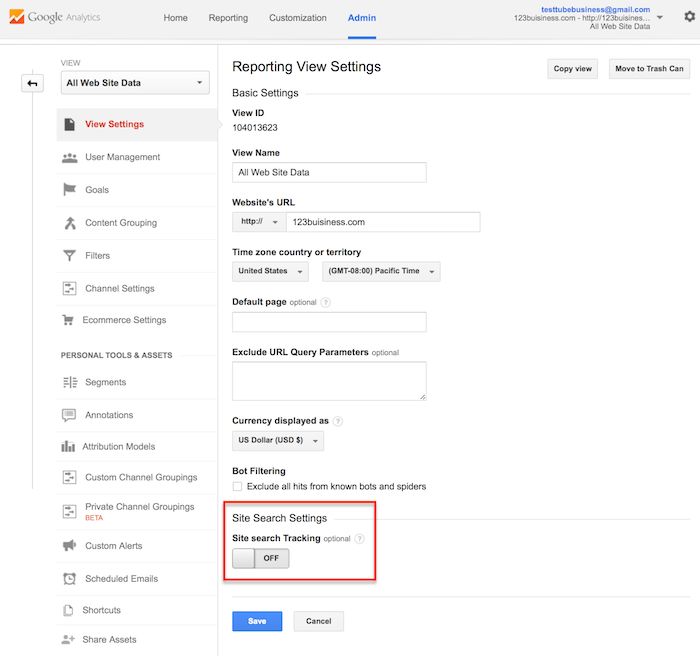
 Go to your Google Analytics Admin menu again, and in the View column, click on View Settings.
Scroll down until you see Site Settings and toggle it to On.
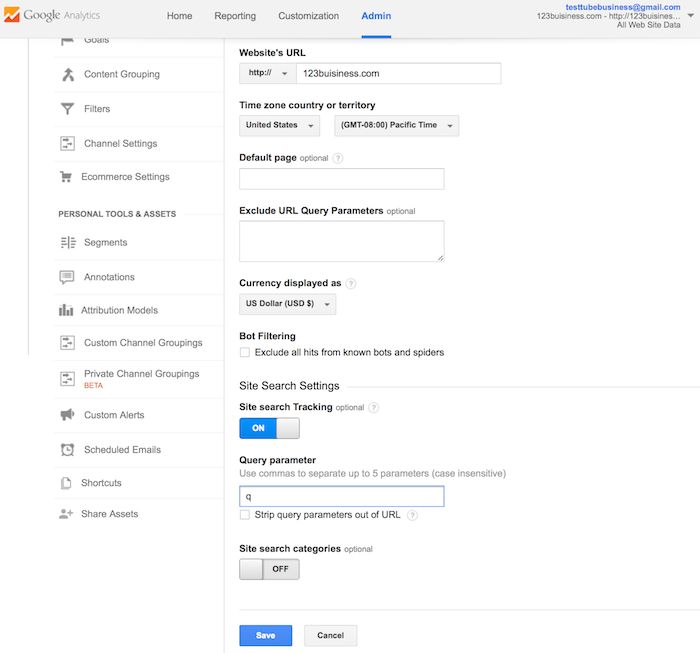
Look back at your URL for your search results. Enter the query parameter (usually s or q) and click Save. On Moz, for example, the query parameter is q.
 This will allow Google Analytics to track any searches made on your website so you can learn more about what your visitors are looking for on specific pages.
4. Add additional accounts and properties
If you want to add a new Google Analytics account, you can do so by going to your Admin menu, clicking on the drop-down under the Account column, and clicking the Create New Account link.
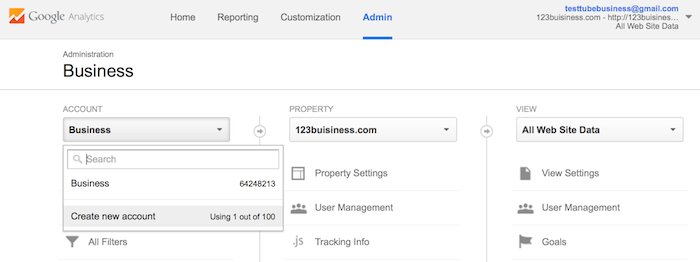 Likewise, if you want to add a new website under your Google Analytics account, you can do so by going to your Admin menu, clicking on the drop-down under the Property column, and clicking the Create New Property link.
Then you will continue through all of the above-mentioned steps.
Once you’ve installed Google Analytics on your website(s), set up your goals, and set up site search(es), you should wait about 24 hours for it to start getting data. Then you will be able to start viewing your data.
5. View Google Analytics data
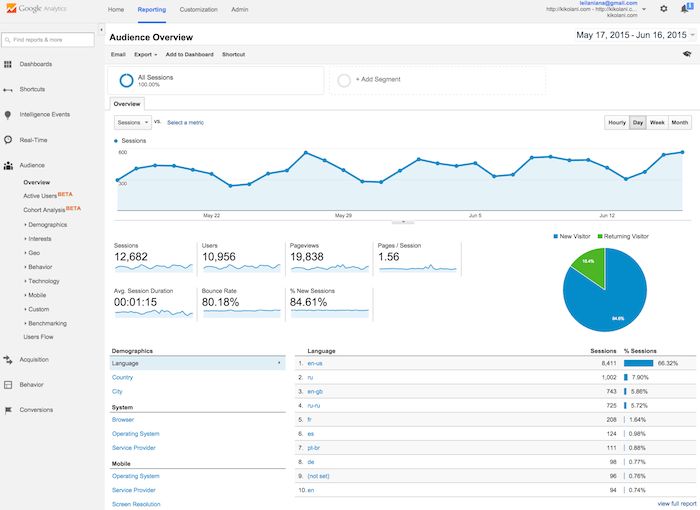
Once you start getting in Google Analytics data, you can start learning about your website traffic. Each time you log in to Google Analytics, you will be taken to your Audience Overview report. Alternatively, if you have more than one website, you will be taken to your list of websites to choose from, and then taken to the Audience Overview report for that website. This is the first of over 50 reports that are available to you in Google Analytics. You can also access these reports by clicking on the Reporting link at the top.
6. Standard report features
Most of the standard reports within Google Analytics will look similar to this. At the top right, you can click on the drop-down arrow next to your website to switch to different websites within all of your Google Analytics accounts. Or you can click the Home link at the top.
In the report at the top right, you can click on the dates to change the date range of the data you are viewing. You can also check the Compare box to compare your data from one date range (such as this month) to a previous date range (such as last month) to view your data.

You can hover over a variety of areas on your Google Analytics reports to get more information.
Beneath the main metrics, you will see reports that you can switch through to see the top ten languages, countries, cities, browsers, operating systems, services providers, and screen resolutions of your visitors.

You can click the full report link on each to see the full reports. Or you can click on any of the top ten links to see more details.
In this view, you can hover over each state to see the number of visitors from that state. You can scroll down to the table and hover over each column name to learn more about each metric.

You can also click on the name of each state to see visitors from cities within the state. Effectively, any time you see a clickable link or a ? next to something, you can click on it or hover over it to learn more. The deeper you dive into your analytics, the more interesting information you will find.
7. Types of Google Analytics reports
Speaking of reports, here is quick summary of what you will find in each of the standard Google Analytics reporting sections, accessible in the left sidebar.

Everything in (parenthesis) is a specific report or set of reports within the following sections that you can refer to.
Audience reports
These reports tell you everything you want to know about your visitors. In them, you will find detailed reports for your visitors’ age and gender (Demographics), what their general interests are (Interests), where they come from (Geo > Location) and what language they speak (Geo > Language), how often they visit your website (Behavior), and the technology they use to view your website (Technology and Mobile).
Acquisition reports
These reports will tell you everything you want to know about what drove visitors to your website (All Traffic). You will see your traffic broken down by main categories (All Traffic > Channels) and specific sources (All Traffic > Source/Medium).
You can learn everything about traffic from social networks (Social). You can also connect Google Analytics to AdWords to learn more about PPC campaigns and to Google Webmaster Tools / Search Console to learn more about search traffic (Search Engine Optimization)
Behavior reports
These reports will tell you everything you want to know about your content. Particularly, the top pages on your website (Site Content > All Pages), the top entry pages on your website (Site Content > Landing Pages), and the top exit pages on your website (Site Content > Exit Pages).
If you set up Site Search, you will be able to see what terms are searched for (Site Search > Search Terms) and the pages they are searched upon (Site Search > Pages).
You can also learn how fast your website loads (Site Speed) as well as find specific suggestions from Google on how to make your website faster (Site Speed > Speed Suggestions).
8. Conversions
If you set up Goals within your Google Analytics, you can see how many conversions your website has received (Goals > Overview) and what URLs they happened upon (Goals > Goal URLs). You can also see the path that visitors took to complete the conversion (Goals > Reverse Goal Path).
Speaking of goals and conversions, most of the tables within Google Analytics standard reports will tie specific data to your conversions. For example, you can see the number of conversions made by visitors from California in the Audience > Geo > Location report. You can see the number of conversions made by visitors from Facebook in the Acquisitions > All Traffic > Source/Medium report. You can see the number of conversions made by visitors who landed on specific pages in the Behavior > Site Content > Landing Pages report.

If you have multiple goals, you can use the dropdown at the top of that section of data to switch to the goal you want to view or all of your goals if you prefer.
9. Shortcuts and emails
While you won’t need every report within Google Analytics, you should explore them all to see what they have to offer. When you find some that you want to visit again and again, use the Shortcut link at the top of the report to add them to the Shortcuts in your left sidebar for faster access.

Or, use the email button to have them emailed to you (or others on your team) on a regular basis.

If you choose to send emails to someone outside of your organization, be sure to regularly check your emails by going to your Admin menu and clicking on the Scheduled Emails box under the View column to ensure only people working with your company are getting your data.
Source Credit https://moz.com/blog/absolute-beginners-guide-to-google-analytics